Below are some screenshots of the GScart RGB SCART switch in action. The left side of the image shows the console connected directly to the capture card, the right hand side shows the GScart in the chain. For a full review of the GScart, click here.
[image-comparator left=”https://videogameperfection.com/support-files/gscart/no-gscart-colour-bars.png” right=”https://videogameperfection.com/support-files/gscart/gscart-colour-bars.png”][/image-comparator] [image-comparator left=”https://videogameperfection.com/support-files/gscart/no-gscart-sharpness.png” right=”https://videogameperfection.com/support-files/gscart/gscart-sharpness.png”][/image-comparator] [image-comparator left=”https://videogameperfection.com/support-files/gscart/no-gscart-sonic.png” right=”https://videogameperfection.com/support-files/gscart/gscart-sonic.png”][/image-comparator]↧
GScart Gallery
↧
Bandridge 5-port SCART Selector review
 Bandridge SCART switches seem to be a bit of an enigma. Many users report that they work exceptionally well and are a perfect fit for any high-end gaming setup. Other users say they’re just as unreliable as the majority of other commercially available SCART switches. Now, thanks once again to our supporter Clarke Gibson, we’ve been able to borrow a Bandridge switch and test it for ourselves.
The Bandridge switch is a 5 port passive manual switch, that means no external power supply is needed. The switch has a good range of connectivity options, there’s an S-Video and composite hook-up on the front and a stereo audio breakout on the back, as well as a 3.5mm headphone socket on the front of the unit. If an input is active and producing a signal, a small red LED will glow on the front of the unit. Inputs are selected by push button, with each button making a reassuringly solid clunk when pressed.
Around the back, the five SCART inputs are spaced reasonably, so using thicker SCART cables should not be a problem.
CSYNC Woes
After having connected the unit to our PEXHDCAP card, we almost immediately encountered a problem with our composite sync (clean sync) equipped SNES and Megadrive. For whatever reason, when using these particular SCART cables with the Bandridge, we couldn’t get a stable picture. Instead, we had to switch to our PAL SNES with a luma sync cable for our regular round of tests.
Apart from this minor incompatibility it has to be said the Bandridge switch performed pretty well. There was only the tiniest bit of brightness lost from the image, despite the switch being entirely passive. Under close scrutiny with the 240p test suite sharpness test you could arguably detect some sharpness had been removed from the image, but it was very marginal.
We’d also heard from other gamers that the Bandridge doesn’t properly isolate each SCART socket resulting in crosstalk. Indeed, since people have opened these switches and inspected their internals, it would seem that the switching mechanism isn’t terribly sophisticated. Neverthelss, we were unable to generate any noise or crosstalk by connecting and powering on other consoles.
Brightness/noise test:- Passed, no noticeable noise added, no noticeable brightness lost from picture.
Isolation test:- Passed, zero crosstalk from other inputs.
Conclusion:- The lack of compatibility for CSYNC cables is the biggest problem with this switch (though, perhaps predictably, not everyone experiences this problem). If you don’t need CSYNC or you’re willing to take a chance that this problem won’t rear its head with your particular setup, you could do a lot worse than the Bandridge switch. Unfortunately, we weren’t able to find this particular model for sale anywhere, so we can’t comment on value. Bandridge also do an automatic version of this switch in the same enclosure, but that’s a different beast entirely so don’t be confused. If you can find one of these switches for around £20 on eBay then it’s worth taking a chance on, but don’t blow big bucks on a Bandridge as they aren’t completely free of issues.
This switch has now been tested for picture quality using a capture card, click here to see how it performed.
↧
↧
Bandridge 5-port SCART Selector Gallery
Below are some screenshots of the Bandridge 5-port SCART Selector switch in action. The left side of the image shows the console connected directly to the capture card, the right hand side shows the Bandridge in the chain. For compatibility reasons these images were taken using a PAL multi-chip SNES console, which doesn’t produce a perfect picture to begin with. For a full review of the switch, click here.
[image-comparator left=”https://videogameperfection.com/support-files/bandridge/bandridge-colour-bleed-direct.png” right=”https://videogameperfection.com/support-files/bandridge/bandridge-colour-bleed.png”][/image-comparator] [image-comparator left=”https://videogameperfection.com/support-files/bandridge/bandridge-sharpness-direct.png” right=”https://videogameperfection.com/support-files/bandridge/bandridge-sharpness.png”][/image-comparator] [image-comparator left=”https://videogameperfection.com/support-files/bandridge/bandridge-sonic-direct.png” right=”https://videogameperfection.com/support-files/bandridge/bandridge-sonic.png”][/image-comparator]↧
SuperCIC and Sync in SCART re-stocked
 Just a quick update to let you know that the SuperCIC boards, for both 1 chip and multi-chip consoles have now been re-stocked. If you need to make your Super Nintendo/Super Famicom console region free, grab a board here.
We’ve also finally re-stocked the popular little Sync in SCART boards. These neat little PCBs fit inside a SCART cable and convert composite video into composite sync. They’re ideal for those of you with Extron Crosspoint RGB switches, for example, that simply must have clean sync input. Much cheaper and more compact than buying an external sync cleaner such as the Sync Strike, you can grab one of these little boards here.
Next up we hope to re-stock our new RGB amps after a small design change. Keep an eye on our website or our social media feeds for more updates.
↧
Keene KPDA Gallery
Below are some screenshots of the Keene KPDA distribution amplifier in action. The left side of the image shows the console connected directly to the capture card, the right hand side shows the KPDA in the chain. For a full review of the Keene KPDA, click here.
[image-comparator left=”https://videogameperfection.com/support-files/keen-kpda/without-keene1.png” right=”https://videogameperfection.com/support-files/keen-kpda/with-keene1.png”][/image-comparator] [image-comparator left=”https://videogameperfection.com/support-files/keen-kpda/without-keene2.png” right=”https://videogameperfection.com/support-files/keen-kpda/with-keene2.png”][/image-comparator] [image-comparator left=”https://videogameperfection.com/support-files/keen-kpda/without-keene3.png” right=”https://videogameperfection.com/support-files/keen-kpda/with-keene3.png”][/image-comparator]↧
↧
JP21 adapters back in stock & Christmas posting dates
 It’s beginning to look a lot like….the end of November! Anyway, we’ve re-stocked the JP21 to SCART adapters for the OSSC (or other SCART devices) and you can now buy these in the store again here, or buy one bundled with your OSSC here.
Remember, you only need a JP21 to SCART adapter if you specifically use JP21 cables. You don’t need one just because you imported one of your consoles from Japan. Use of JP21 cables is rare in Europe, uncommon in the US and Canada but quite widespread in Asia.
While we have your attention, please keep in mind the last posting dates for Christmas, if you want to make sure Santa gets your OSSC to you in time:-
UK (including Channel Isles) – Thur 21 Dec
Belgium, France, Ireland, Luxembourg – Sat 16 Dec
Austria, Denmark, Iceland, Netherlands, Norway, Portugal, Slovakia, Spain, Switzerland – Fri 15 Dec
Canada, Finland, Sweden, USA – Thur 14 Dec
Czech Republic, Germany, Italy, Poland – Wed 13 Dec
Greece, Turkey, Australia, New Zealand – Sat 9 Dec
Caribbean, Central and South America – Thur 7 Dec
Cyprus, Malta, Asia, Far East, Eastern Europe
(except Poland, Czech Republic and Slovakia) – Wed 6 Dec
Africa, Middle East – Sat 2 Dec
Customers outside of the EU should always allow for delays as packages go through customs.
Although the vast majority of OSSCs get to our customers with no issues, things can and do go wrong with shipping, so the sooner you order the more likely it will be that an OSSC will be waiting under the tree this Christmas.
↧
New and re-stocked cables
 The sun is shining here today and apparently there are some famous people getting married, but we don’t concern ourselves with such things when we have new, exciting cables in stock! Today we’ve re-stocked several of our popular RGB cables and also introduced a couple of new ones.
For starters, the JP21 to SCART cables are now back in stock. If you want one with an OSSC, just add it to the basket along with your OSSC, as the OSSC sales page will still say it’s out of stock (the stock control stuff in our e-commerce plugin could do with an overhaul).
A few people wrote in and asked if we could make some SCART to JP21 adapters for use on XRGB scalers and suchlike. “Don’t be absurd” we said, “why would we support our competitors products?”. Just kidding, of course we can get some of those and we have. You can grab them here.
Got a mighty Extron Crosspoint switch? If so you can now hook up more devices to it as our SCART to Extron input cables have been re-stocked. Grab those colossal cables here.
Finally, you can now easily connect your Extron RGB switch to your OSSC, Framemeister, TV or any SCART compatible device with our Extron to SCART output cables. In case you were wondering, yes our Extron output cables are properly attenuated for 75 ohm CSYNC.
Whether your playing retro games, modern games, watching Royals get wed or, gasp, enjoying the Sunshine, have a great weekend.
↧
CPS2 Digital boards and SCART testers
 Today we are pleased to announce two new products have been added to our store.
First of all, the CPS2 Digital modification is now available to anyone and everyone. As expected, we cleared the waiting list of orders with this new batch and now we can offer the part for general sale on our store.
If you haven’t been keeping up with the project, the CPS2 digital allows you to add an HDMI output to your classic CPS2 or CPS3 arcade hardware. The mod is lag free and supports 1080p (and 1200p in a future update). Click here if you want to read more about it.
We have CPS2 digital kits in stock for both DIY customers and for those of you that require a fitting service.
Secondly, we are pleased to announce that we are now stocking the Retro Sampling SCART tester board. This handy device makes it really easy to test your SCART cables and RGB SCART outputting equipment. If you regularly watch the excellent RetroRGB podcast, you will know about badly configured hardware causing damage your equipment by supplying too much voltage.
Using the SCART tester board it’s super easy to check voltage and resistance on your SCART cable to make sure it’s suitable for connecting to other equipment such as vintage televisions or of course the OSSC. Check it out by clicking here.
We are not finished either and there are several exciting products in development behind the scenes, so check back regularly or follow us on any of the popular social media channels (or Tumblr  )
)
↧
Improved JP21 adapter cables now available
 If you are buying new RGB cables for your retro consoles we always recommend using EuroSCART spec cables as those are the most readily available. What if you already cabled up your system with JP21 spec cables for the old Micomsoft scalers such as the XRGB3 or XRGB Mini though?
Well, worry not. We have re-stocked our JP21 to SCART and SCART to JP21 cables today. Not only that, the new cables are a brand new design. With additional shielding for the audio pins, these new adapters eliminate that annoying added audio buzz that our older cables (and cables sold by many of our competitors) could introduce or amplify in many cases.
At €14.50 these cables are significantly cheaper than our competitors models too and we believe they offer the best possible value.
Grab yourself a JP21 to SCART cable here, or a SCART to JP21 cable here.
↧
↧
Building our New Games Room – Part 6 – Avoiding Connection Chaos
Welcome to the next instalment of our new games room write up. With displays and sound systems all chosen, we can start to work on the switching setup that will glue it all together. AV switching hardware varies in price from tens to thousands of Euros, so a little prior planning will be necessary to make sure you don’t go over both your financial and space budgets.
Plans on the floor
Before you start purchasing switches, it’s a good idea to go back to your floor plans and, armed with your trusty tape measure, make an educated assessment of just how many consoles/computers etc you expect to have in your setup. If you’ve already chosen your speakers and displays, be sure to add those into your plan too.
It might sound like an obvious thing to say but, the more systems you have, the more complex the cabling becomes. Alternatives like emulation or Mister might not look as cool as a working SNES or Commodore 64, but they can reduce cable clutter while giving you access to those systems games libraries. We will take another look at cable management in the next part but, it’s still worth considering at this stage.
When you have chosen your systems, you should break each one down into categories. Broadly speaking, when it comes to AV, we can initially divide games consoles and computers by those that have HDMI (or DVI) and those that do not, but of course it’s not that simple. Within HDMI you will encounter roughly three different types.
HDMI 2.1 – Cutting edge systems like modern PCs, PS5 and Xbox series S/X. We talked about how to handle these systems in the previous article.
4K HDMI (HDMI 2.0 and 2.0a) – Systems like PS4, and Xbox One. To use these systems to their full potential you will need HDMI 2.0 compatible switching hardware. Be careful here since some HDMI switches that claim to support 4k/HDMI 2.0 will only support 4k at 30 frames per second. This is ample for movies, which typically run at 24 frames per second, but no good for gaming.
Legacy HDMI (1.4 and earlier) – Systems like PS3, Xbox 360 and HDMI modded consoles like the PS1 Digital. Pretty much any HDMI switch on the market will work with these, though it is worth checking the specs just to be sure.
HDMI 2.1/2.0 switches are backwards compatible, but since legacy HDMI switches are more affordable, and HDMI 2.1 switches are still pretty much non-existent, you may find it more economical to buy a separate legacy HDMI switch for those systems that do not output 4k.

For analogue video, things become even more complicated. There are VGA and SCART connectors that carry RGB signals and component video (YPbPr) which carries a similar high quality analogue video signal. SCART cables can carry RGB, but cheaper ones may only carry composite video, despite looking identical. Then, some systems are limited to S-Video, composite video or even just RF. Many retro consoles support multiple different output cables and formats either directly or by third party add-ons. You will want to use the best possible signal from your consoles especially if you plan to upscale or process it further down the video chain, so be sure to do your research and pick out the best cables and accessories.
Some retro systems may benefit from hardware modifications to boost the quality of the output signal they offer. If you’re willing and able to do this for your consoles it can be well worth it. If you have a lot of systems you might want to consider HDMI mods for some of your retro consoles, if only to reduce cable clutter. A single HDMI cable is a lot less bulky than the 5 x RCA cables from a component video plus analogue audio setup.
The perils of AV switching

Once you have your systems in categories, you can research and buy the appropriate switches for them. Choose your switching hardware carefully here. Cheaper HDMI switches often have random, inexplicable problems with some systems. Over on the analogue side, cheaper SCART switches are known to have crosstalk between connected devices which can cause issues even when other devices are powered down.
If you need to switch multiple analogue signal types, note that most SCART switches will also carry component video with a suitable adapter, while the reverse isn’t always true. Some VGA switches will not carry 15khz video as generated by retro consoles, or will trip up on interlace video.
Professional grade BNC switches can be adapted to carry every type of analogue signal other than RF, but may need special adapters to work safely with consumer grade hardware.
There are also systems that output only analogue video, but also have the option of digital audio for much improved sound quality that may need some special considerations.
Remember that every switch you add into your setup unfortunately is another complication and potential point of failure. We cannot stress this enough, be sure to test, test and test again. Both analogue and HDMI switches are prone to strange and inexplicable compatibility issues. In our setup, for instance, our HDMI matrix switch was strangely incompatible with the MakeMhz original Xbox HDMI mod. Order your switching hardware from somewhere that has a generous returns policy!
If you do have problems with HDMI gear, some issues can be resolved by using a Dr HDMI device. We reviewed this little device way back in 2013 and since then a 4k version has appeared too. If you encounter strange HDMI compatibility issues, try a Dr HDMI unit and re-test, it may just solve the problem. If it does not, be sure to test again with the Dr HDMI powered up with an external PSU too.
Give me your answer, do…
Daisy chaining, the process of plugging one switch into another one, is something that should be avoided if possible, but something you’re likely to end up doing on larger setups. If you have to attempt a daisy chain, be sure to test everything carefully. On daisy chained HDMI switches, check that both video and audio is working properly and test for at least 15 minutes on each source. For analogue switches, check that the image is not darkened and that there’s no added picture noise.
For our games room build, our eventual switching setup comprised the following units:-
AV receiver – Denon AVR-X4500H – Our AV receiver has a HDMI switch built in, but this doesn’t have enough ports for our needs and it doesn’t support HDMI 2.1. We went over how we dealt with this in the last article, so check that out if you need to.
HDMI switch 1 – No Hassle AV 16×16 matrix – A monster HDMI matrix allows us to route almost all our sources to our different displays and capture cards. This is an older model which, despite it’s high cost, is still not capable of switching 4k60 sources, so pretty much only qualifies as a legacy HDMI switch for our purposes. The companies newer switch claims to not only support 4k60 but also 1080p downscaling too, however 4k120 and VRR support are still not included. In practise, the switch wasn’t quite “No Hassle”, since we did have to use a Dr HDMI with a couple of things we connected.
HDMI switch 2 – CKL 16 Port – When 16 ports is not enough, you’re most likely going to have to daisy chain (or spend an absurd amount of money on an industrial HDMI switch). Fortunately we had this switch from our old setup in the UK and it worked perfectly well when chained with the No Hassle model.

Analogue video switch 1 and 2 – Extron Crosspoint – Extron’s bulky, industrial Crosspoint switches make an ideal solution for a larger setup. While considerably more bulky than a GscartSW or Hydra switch, for instance, they provide multiple inputs and outputs that are easily adapted to supporting any kind of analogue video. These switches are basically indestructible and come up regularly on eBay having been removed from installations upgrading to digital video. Buy second hand, as the price of a new unit is likely going to be thousands, if you can even find a dealer still stocking them. Remember when purchasing BNC to SCART output cables to use with the Crosspoint that any output cables need to be attenuated to 75 ohm consumer standard, see this article for more information, or just check with the cable manufacturer that this attenuation resistor is included.
Video processors and video signal converters

Of course, you’re not going to connect those old analogue only consoles to your HDTV directly are you? The entire raison d’être of VideoGamePerfection starting up was to help people connect their old legacy consoles to their HDTVs the right way, without compromising on picture quality or input lag.
For our setup, the main analogue to digital conversion was done by 2 x OSSC Classics. At the time of building the setup neither the OSSC Pro nor the RetroTINK 5x were available. Luckily, since we have a CRT in this setup we’re able to use this to play the handful of titles the OSSC Classic struggles with. A Koryuu was added to allow for composite and S-Video compatibility too.
Why two OSSCs? Having two independently allows for different scaling and processing options for video capture, or to allow the same system to be displayed differently on different monitors for comparison.
For anyone building a setup now, especially one that doesn’t have a CRT in it, we’d have no hesitation recommending the RetroTINK 5x, if you can get your hands on one. If not, the OSSC classic still makes for a great scaling solution for most retro content. The OSSC Pro is in an advanced stage of development and will undoubtedly come highly recommended when it launches early 2022.
We did originally keep our venerable XRGB Mini Framemeister around, just for the fantastic deinterlacing, but eventually shelved it as we preferred PS2 games on the CRT (using the OSSCs bob deinterlacing) or by emulator instead.
Apart from the OSSCs and Koryuu, we have two other video processors in our setup.
HD Fury DIVA – The HD Fury DIVA was added to the setup for two reasons. Firstly, it works fantastically well as an eARC manager. We talked about eARC in our previous article, so check there if you’re not sure what it’s all about. While our LG TV and Denon receiver are supposed to support eARC without the need of another processor, sadly that wasn’t always the case (at least with earlier TV and AV receiver firmware), but luckily the DIVA takes care of it nicely.
Secondly, the DIVA can actually downscale 4k to 1080p. This is useful if you wish to play more modern consoles on a classic multisync CRT, without the need to adjust output settings every time you wish to do it. However, since the DIVA can’t process signals using variable refresh rate, this function ends up being largely redundant now that the PS5/Xbox Series X/GTX3090 have been added to our setup.
DVDO Iscan VP50 Pro – A beloved classic video processor. Despite featuring a rather dated scaling engine, the VP50 can’t be beaten for flexibility. Its zoom controls are excellent and will let you abuse them a lot before breaking the scaling uniformity to a really noticeable degree. These days, the 50 Pro gets used mainly for downscaling and resizing the 720p output of the GBA Consoliser to fit on our classic CRT.
To round things off, we used a HDFURY X3 HDMI to VGA adapter. This serves two purposes in the current setup. First of all it lets us display HDMI consoles on our classic multisync CRT. Secondly, it allows for devices which output HDMI to be further processed using the OSSCs. This is particularly useful for our HDMI modded Wii and Xbox consoles which benefit greatly from the OSSCs 480p X 2 processing mode.
It is fair to say that this setup is a little overkill. The two OSSCs are certainly an extravagance, and the HD Fury DIVA doesn’t really serve much purpose other than being a fancy HDMI switch and useful eARC processing box. The VP50 Pro gets very little use these days and should eventually be replaced entirely by the OSSC Pro.
Planning for connecting

Before you commit to your particular switching solution, it’s a good idea to get everything down on screen (or paper) and make sure everything works at least in theory. A good old fashioned spreadsheet, like Excel or the free Libreoffice Calc can help here. Simply create a table listing the inputs and outputs of your AV switch, and write in each cell what you intend to connect. Expand the spreadsheet to contain all your hardware and make sure there’s a place for everything.
Once you’re happy with the theory, only then do you reach for your wallet and actually buy the hardware. Again, when planning your own builds, consider which scalers and converters you need based on your budget and what systems you play. For retro systems that output RGB, an OSSC or RetroTINK 5x is usually the best choice. For systems that output only S-Video or composite, usually a RetroTINK 5x or 2x Pro is a good choice. Going into the best choices of scaler or line doubler for each system is beyond the scope of this article, so be sure to check reputable sites like RetroRGB or My Life In Gaming for system specific recommendations.
If you have systems that output only RF and cannot be modded, you might want to consider using an old VHS recorder. With this setup, you should be able to tune in your old systems to the VHS recorder, then go from there via composite into a RetroTINK of some kind, or a Koryuu. Don’t expect a great picture, no video processor costing $50 or $5,000 can get around the inherent limitations of these old RF signals, but you should at least be able to play this way.
With switching hardware dealt with, the next article will discuss cable management and related issues. We never paid enough attention to cable management in our initial build, which had some disastrous consequences, so the issue definitely warrants its own article, which you can now read by clicking here.
↧
Fixing the GamesCare Switch Audio Issues
 A number of customers who purchased the GamesCare Smart SCART switch or the GamesCare Component Video Switch noticed that when using the switch with high quality audio equipment, certain sounds were distorted or corrupted. We have investigated this issue extensively with the help of both GamesCare and BetaGamma Computing and created a fix for this issue, which affects both products (and the GamesCare SCART switch expansion).
Note that this is NOT a product safety issue. There is no risk to you or your equipment. If you are satisfied with the performance of the switch, you do not need to do anything.
If you purchased your GamesCare product from us, you are entitled to get this upgrade done for free. Please use the contact form here, and send us your order number, so we can advise you on the best way to return the switch to us to have the upgrade installed. If you purchased your GamesCare switch from elsewhere, BetaGamma can upgrade your switch for a small fee, or you can install the fix yourself or have a local modder do it.
Smart SCART Switch Firmware 2.1
All Smart SCART switches now shipping and any that we repair will also have the new firmware version 2.1 installed, which fixes some other minor issues with the device and has the following new features:-
- User selectable pin 16 signal voltage – Allows for full compatibility with older CRT TVs that require appropriate signal voltage on SCART pin 16
- Faster start up time
- Automatic over-the-air updates for any future firmware
- LCD Menu allowing configuration of advanced features without the need for a Wi-FI connection
DIY upgrade instructions
BetaGamma computing have kindly provided a service bulletin with instructions on how to install this upgrade. details of this can be seen below, or you can download it directly in PDF format here.
VGP Service Bulletin – GamesCare Switch units Feb 2025
This Service Bulletin describes modification details for the GamesCare suite of switches (Smart SCART, Automatic Component Switch and SCART Expansion) which will improve the audio performance of all three products.
Note that this is NOT a product safety issue. This upgrade is optional but can be implemented if the user finds issues with the audio output of any of the three products.
To complete the upgrade, there are two modifications that need to be implemented.
The first modification changes the bias arrangement of the two onboard analogue switch chips. This increases the headroom and provides true AC signal output. One chip handles left audio, the other chip handles right audio.
This modification applies to all three products, the Smart Scart Switch, Automatic Component Switch and the Scart Expansion unit.
The second modification applies ONLY to the Smart Scart switch.
The Smart Scart Switch buffers the audio outputs through a unity gain operational amplifier. Some production units were manufactured with an LM358 OpAmp but a TL972 is preferred as this is a higher performing device and will drastically improve the audio performance of the device.
These modifications are all SMD rework level and require a very high level of competence to be correctly carried out. Suitable rework station, fluxes, and solders are required. The modifications should NOT be attempted unless you are confident and skilled to carry out the rework.
VGP offer an upgrade service for ALL of these products regardless of source of purchase, please get in touch if you need this rework carried out.
In all cases the units will need to be stripped down. All plexiglass plates and stand-offs need to be removed. Please pay careful attention when disassembling and perform the same steps in reverse to reassemble the units once work is complete.
Parts Needed for all 3 Products
1. -5V Buck Convertor – https://www.aliexpress.com/item/32955462579.html
Or similar device with 200mA capacity.
Part needed for the Smart Scart Switch
2. https://mouser.com/ProductDetail/Texas-Instruments/TL972IDR?qs=oFh0aswXlb%252Bs7%252BxhuL08lw%3D%3D
This is the higher performance OpAmp.
Smart SCART Switch
All rework is carried out on the rear or solder side of the board. Click or tap on any image on the page for a bigger view.
1. Buck Convertor Installation

Locate IC’s 5 and 6.
Lift pin 6 of both IC’s, ensuring they are clear of any contact.
Fit the Buck convertor in place using a suitable insulated fixing method and wire up as shown in the photo above using Kynar 28awg hookup wire.
Ensure no shorts between VCC and GND before connecting power.
2. OpAmp Replacement

Locate and remove IC18, fit the new OpAmp in place.
SCART Switch Expansion
Essentially this procedure is the same as the main switch unit.

Component Switch![]()
The procedure is largely the same as the Scart switch except:-
IC 4 and IC 5 are to be reworked and the modification is on the top side of the board.
It is highly recommended to use some Bostik Fix and Flash, or similar glue, to secure the wire to the points circled in blue in the above photo.
Bas Gialopsos – BetaGamma Computing – 16th February 2025
↧
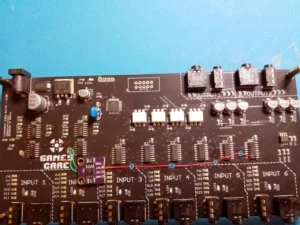
Updating the Firmware on the GamesCare SCART Switch
This tutorial will show you how to update the firmware on a GamesCare 8 in 2 out Smart SCART Switch. If your switch is running firmare 2.0 or higher, you do not need to follow this tutorial and you can instead update the firmware using the online update option by connecting the switch to the internet.
 Warning! Incorrectly flashing your GamesCare product can result in it becoming inoperable. Please proceed at your own risk. Errors or malfunctions caused by incorrectly flashing the firmware are not covered under warranty. If in doubt, please use our GamesCare Switch update service here, where we will upgrade the switches audio performance and install the new firmware for you.
Soldering skills are required in order to install the required header for the programmer. If you are not confident with a soldering iron it is highly recommended that you send your switch in for servicing/updating instead.
Prerequisites
In order to complete this tutorial, you will require the following things.
- FT232RL USB TO TTL 3.3V/5V FTDI Serial Adapter Module (available e.g on AliExpress)
- 6 Position Header Connector (for example, this one from DigiKey)
- Soldering iron and workstation
- Windows PC (it may be possible to use Linux or Mac but only Windows is covered in this tutorial, sorry!)
Adding the programming header
Dismantle your GamesCare SCART switch by unscrewing the screws on the top of the unit. Keep a note of where each part goes, since you will need to follow this process in reverse to reassemble the unit once firmware flashing is complete.
Solder the 6 position header to the bottom left of the SCART switch PCB, directly to the left of the reset button. Check your work for shorts, particularly make sure not to short pin 4 (VCC or voltage) with any other pin.
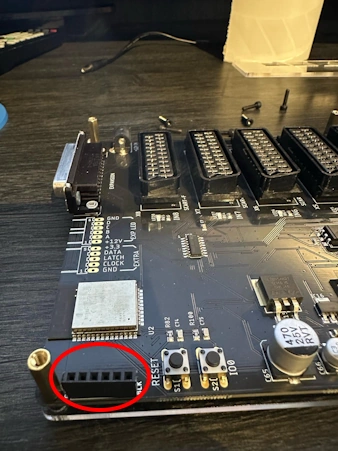
It is strongly recommended that you do NOT skip this step. Without the header installed, the programmer may not make proper contact with the PCB. This can result in the flash process failing part way through, rendering the switch inoperable.
Setting up the programmer
Configure your FT232RL programmer to 3.3 volt mode by moving the jumper so that it is set between the middle pin and the right pin.
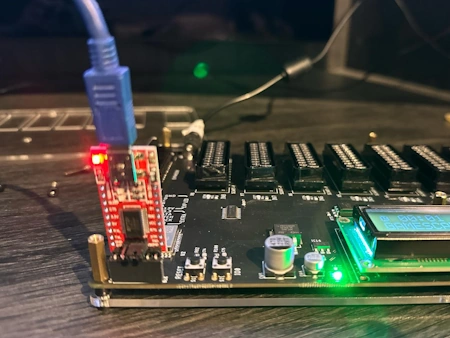
Connect the FT232RL to your Windows PC using a mini-USB to USB-A cable. A small red light should illuminate on the programmer.
Determining the correct COM port
Since your PC may have one or more COM ports already in use, it is necessary to use Device Manager to determine the correct COM port number.
First, open Device Manager on your PC, by searching for “Device Manager” on the Windows search bar, or by navigating to Windows control panel. Administrator access is not required since we are not changing any settings, so any warnings about this can safely be ignored.
With Device Manager open, search in the list for “Ports (COM & LPT)” and expand it.
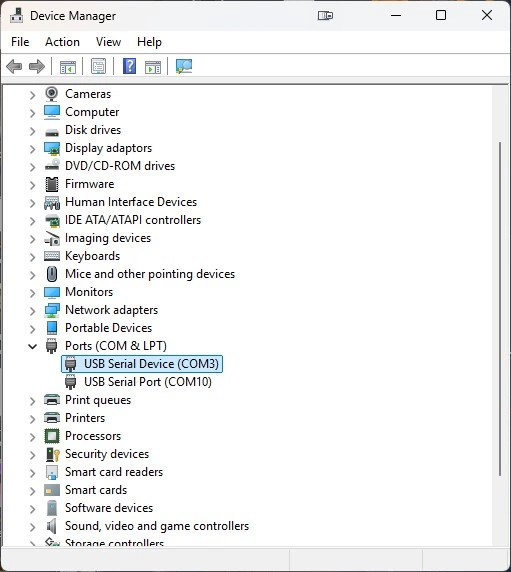
Just as in the example above, you may see several different entries under “Ports (COM & LPT)”. Double click on each one until you find one that matches the picture below.

Note the COM port number (in this example, COM10) and then close the properties window.
Extracting the firmware files
Download the zip file here and extract it to the root of your C:\ folder. If you want to use another location on your PC then note that you will have to manually fix the file paths yourself within the flash download tool.
Open the “gcfw” folder on your C:\ drive and start the “flash_download_tool_3.9.7” program by double clicking on it. The window shown below should then appear.

Ensure your options are set the same as in the example (“ChipType ESP32”, “WorkMode – Develop”) and then click “OK”. The following window will then appear.
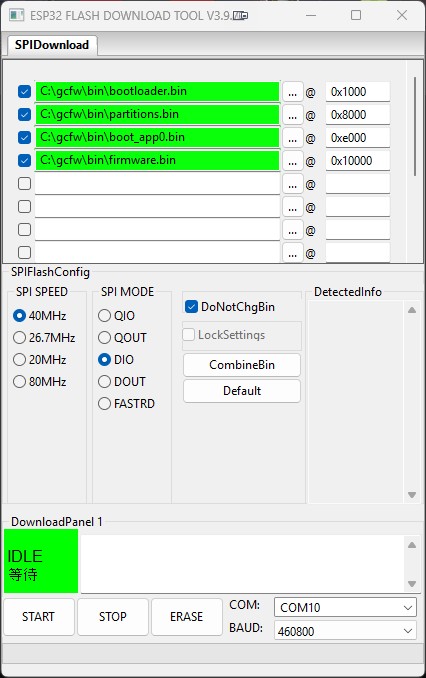
Set all the options as per the screenshot above. Make sure the hex numbers on the right match with the ones in the sceenshot too. If you didn’t extract to the root of your C: drive, use the “…” button to correct the paths to the firmware files.
At the bottom right of the window, check that “COM:” is pointing to the correct COM port. This is the port value that you determined previously, and may be different to the one shown in the example.
Connecting the programmer
Connect the programmer to the pin header you soldered onto the board. The programmer should face outwards with the LEDs clearly visible. Once connected, power on the GamesCare switch.
With the programmer now connected to both your PC and the GamesCare switch, and with the GamesCare switch powered on, click on the “START” button at the bottom left of the ESP32 Flash window.
On your PCs screen you should notice a black command prompt window, it usually appears under the ESP32 Flash window. Move this window so it is visible and you should see the following text, followed by a string of full stops that keeps growing.
test offset : 4096 0x1000
case ok
test offset : 32768 0x8000
case ok
test offset : 57344 0xe000
case ok
test offset : 65536 0x10000
case ok
..............................
Press and hold both the RESET and IO0 buttons on the GamesCare switch for around 10 seconds, then release them. Programming should then commence, if it does not, try holding the buttons again. You might need to try several times, but eventually it should work and you will see the following text appear.
Uploading stub...
Running stub...
Stub running...
Changing baud rate to 460800
Changed.
NO XMC flash detected!
FLASH_CRYPT_CNT 0
ABS_DONE_0 False
Compressed 17536 bytes to 12202...
Compressed 3072 bytes to 129...
Compressed 8192 bytes to 47...
Compressed 1230688 bytes to 844653...

is stub and send flash finish
Congratulations, you have now updated the firmware on the GamesCare switch. Power off the switch, remove the programmer and reassemble the case and the process is finished. Future firmware updates can now be applied automatically by simply using the firmware download option on the switches menu (Wi-Fi and internet connection is required).
↧